From the tip of its nose to the tip of its tail, this is one beautiful aircraft add on, inside and out! If you want to find out what it takes to fly the ATR 72-500, Flight 1's product is the closest thing I've seen yet! Those of you "seasoned" flight simmers that are familiar with various avionics of larger aircraft, i.e., FMC's (Flight Management Computers) and the like, will find this product especially realistic. I’ll get into details on that aspect in a bit. You simmers out there that have experience with your basic "heavies" that are default with MSFS 2004 and previous versions, will find a whole lot more avionics than in your average default aircraft! For you newcomers to the world of flight sim, I would have to say that as complex as this product may seem, there are options and tutorials that can get you up and running in...I was going to say no time at all, but in fact, there is some challenge in authentically learning to "fly" this aircraft. You can, however, start from three different options that you can set up in the Configuration Manager, that Flight 1 so handily provides with there products. These options are; cold and dark (man oh man, someone should have gotten here sooner and warmed this cockpit up a bit! BRRRRR!!!), Ready for Boarding, or Ready for Taxi (someone DID show up and warm her up for you, but where's my coffee?)! This package has a lot to offer at any level of experience. So, even if you are new to this hobby, you learn by challenging yourself, and this package is a great challenge, indeed!
The ATR 72 is a version of the ATR 42 lengthened by 4.5 m (14 ft 9 in) and with modified wings. It was announced at the 1985 Paris Air show and made its maiden flight on October 27, 1988. Exactly one year after that, on October 27, Kar Air commuter airline of Finland became the first company to put the plane into service.
Production locations
Alenia Aeronautica’s manufacturing facilities in Pomigliano near Naples produce the aircraft fuselage and tail sections. Aircraft wings are assembled at EADS Sogerma Services in Bordeaux in western France for Airbus France.
Final assembly, flight-testing, certification and deliveries are under the responsibility of ATR in Toulouse, France.
Three main variants:
AT 72-200, the original production version
ATR 72-210, with updated engines
ATR 72-500, originally named the ATR 72-210A, with higher weights and improved airfield performance.
The first ATR 72 freighter with a large cargo door was unveiled at Farnborough 2002
Deliveries
At March 2003, 370 ATR 42 have been ordered and 306 ATR 72, totaling 676 orders. Of these orders, 655 have been delivered.
There are 109 operators of the complete ATR range (ATR 42 and ATR 72) in 72 countries.
Details
Accommodation: 2 crew + 74 passengers
Cargo/baggage:10.6 mł (375 ftł)
Max speed: 275 knot (509 km/h)
Range: 910 nautical miles (1,685 km)
Wingspan: 27.1 m (88 ft 9 in)
Length: 27.2 m (89 ft 2 in)
Height: 7.7 m (25 ft 2 in)
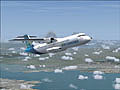
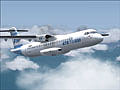
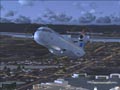
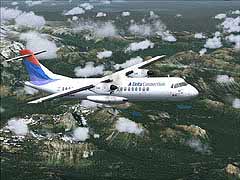
The aircraft modeling is absolutely beautiful! (Many nice compliments on screenshot forums, thank you very much!) With its three different liveries, ATR House colors, Air Caraibes, and Atlantic Southwest Airlines. The Text-O-Matic utility, that is included with Flight 1 products, makes it easy to download and create new liveries. All flight surfaces work fantastically, with great detail and sounds, detailed gear, control surfaces, etc. The quality of this product really shows in how real everything looks, and the fine attention to the smallest of details, both inside and out. Speaking of the inside lets head on into this beautiful prop job!
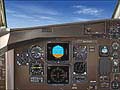
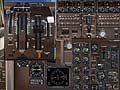
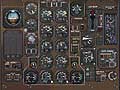
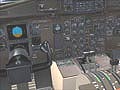
Here's where the intimidation first set in! I dared to pull up the overhead panel without consulting the manual first, an on-going, bad habit of mine, and there, before me, filling my screen, was one of the most comprehensive looking overhead panels I have ever seen! This is not an overhead, eye candy popup either. Everything does something, and if you are going to do a "cold and dark" start, you better bring a cup of coffee and your checklist, because what you are about to experience is an extremely close rendition of just what those folks are up to in the front of the plane! We'll get to the details of a couple of the sub panels in a few. Let's talk about the inside of the aircraft some more! There's a lot to talk about, so if I ramble, use the scroll bar!!! But I think you might want to know some of the details of this fine aircraft!
"Visually Stunning" are the first words that come to mind when I think of how to describe the interior of this aircraft! Panels and gauges are very detailed, with fully functioning controls. Again, not just eye candy, but eye candy that works! Within the Configuration Manager, you have the option of setting the Cockpit Views.
To sum these views up, they are variations of the following:
Captains Full Cockpit View
First Officer Views
VFR Primary Panel Views
Condensed Views
Blue/Grey or Standard Panel Color
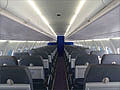
Experimenting with these different views proved handy, for some of them offered better in flight or take off/landing views that offered better visibility during those phases of flight. If enabled through the Config Manager, you may take a "virtual peek" into the cabin area to see if there is any mischief on board! This is accessed by viewing rearwards in 2D, and clicking on the areas where your cursor changes, i.e. the cabin door. The same goes for changing views about the cockpit in 2D, there are "click spots" to change these views, and proved handy, even if you do have a "hat switch". If you click the top of the panel, at the very top, it will change into a condensed view, making visibility better for landings and takeoff. A nice feature making viewing options easier. The passenger cabin as well, is finely detailed. I suppose the developers at Flight 1 just could not be happy until everything looked great! You probably won't spend too much time in the cabin area though, no wild, in flight parties or panicky passengers to deal with, so back up front we go to discuss some of the avionics of this aircraft.
Within the Configuration Manager, accessible in the start menu of your windows program, a host of settings are possible, ranging from fuel, to how many passengers (male, female, or child, and where they sit) are on board. While adjusting the load, you may adjust in 50 pound increments to the fore or aft of the aircraft. Other settings are also available and mentioned throughout the review.
The 2D and Virtual Cockpits were extremely detailed and very real looking. When passing the cursor over certain knobs or switches, most would indicate what their function is. However, I did find that when the cursor passed over some of the items, no identification of that item was made, even though it was functional. Might have been me, but it did it after a reinstall also. This was a bit frustrating, when in the early phases of learning just what the heck everything does, but for the most part, this function showed most of what was available, and did not prove to be a major problem at all.
You'll have the benefit of your partner in the right seat making various "call outs" for you, such as V1, V2 speeds, gear up, and various other helpful "audios" from him. Speaking of the audio, we may as well mention here that detail did not just go into how the aircraft looks and fly’s, but the sounds are authentic too. Especially realistic is the startup when you first "enter' the cockpit and get things rolling, complete with all the clicks, whirrs, and whines that you would normally here. (Is that an expert description of the sounds or what?) Other audio call outs are:
Copilot call outs
TCAS Warnings
GPWS Warnings
Various other warnings and ambient sounds.
These audio effects really add quite a bit to the realism of the flight experience.
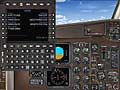
As I have said before, I was a bit overwhelmed at first by the massive amount of detail provided in the cockpit area. For this review, I'm going to discuss two of them. The first, the Multifunction Control Display Unit MCDU, otherwise known as a Flight Management Computer (FMC). Some of you may be familiar with this valuable tool already. There is much more to this system that's installed in this aircraft, than just hitting a button on its panel, and having a route from your sim popped into the FMC, and away you go! Oh no! Here's some of that realism I was talking about. Except for a couple of minor function buttons, that the use of are not integral to the operation of the FMC, what you are looking at is pretty much a functional FMC. The ATR 72-500 uses the Honeywell HT 1000, which is actually a Global Navigation Satellite System (GNSS). It's basically a GPS system that uses a GPS antenna and a navigation processing unit to interpret and transmit the acquired information to the various avionics, such as the MCDU, Autopilot, and the HSI. Alpha/Numeric buttons are operational, line select keys are operational. It seems to me that if you were to come up face to face with an actual FMC, in an ATR 72-500, you would not be completely lost! In the manual, which is a subject all unto itself, there is information and tutorials that will walk you through all functions of this amazing device. Honestly, I am still practicing with it. This is not a "read it once and fake your way through it" type of set up. There is definite learning to be done here!
The Automatic Flight Control System (AFCS) is the other avionics system that I would like to mention. Here you also have state of the art technology that will get you where you want to go with ease. The functions of this panel covers the range of all your basic hold modes. Except for the layout of the panel, this is not too difficult a system to figure out.
The reason I mention these two systems is that I found them to be the ones that I focused more attention on at the first. they also represent the Yin/Yang of the avionics packages. As far as the learning curve goes, I spent a bit more time learning the basics of the FMC than any of the other avionics. I want to emphasize here that only at first, was I overwhelmed and left a little breathless at the prospect of ever getting this thing started! It was nothing that a bit of reading and some practice didn't rectify! It was a fun challenge! You can compare it to getting bored with the easy crossword puzzles, so you jump up to the expert level, and find that you may not know a lot of the words, but you have fun trying, and if you keep at it, you may learn a new word or two. Not curse words either!
The manual that is provided is in PDF format, and is 481 pages long. Yes, 481 pages! Did I mention something about not being a stranger in the cockpit of a real ATR? This manual is quite extensive, covers a lot of ground, and if you print it all up, you may have to get a new cartridge sooner than you thought! The above two sections on the FMC and the AFCS were the two sections that I printed up to have handy while flying this aircraft. This was about 50 - 60 pages or so, and turned out nicely on the fast draft setting in your print preferences dialog box. (REMEMBER, when printing these manuals, unless there are some graphics that require fine detail, you can get away with printing in a lesser quality setting, like fast draft, and this saves LOTS of ink, especially if there are graphics of some of these avionics that uses lots of black background.) The other items out of the manual that I printed were the Tutorials concerning the flight ops, from battery start to touch down. A very nicely laid out check list was also one of the items that I printed, and it was 3 pages.
They take you on two different tutorial trips, the first from Point-a-Pitre, Le Raizet airport, ICAO TFFR, to land 45 minutes later at Fort de France Le Lamentin airport, ICAO TFFF, Martinique. I did a lot of pausing in this flight, to check systems, look at the manual, look outside, and look for my coffee...
It was a fun flight that I flew a few times and will fly a few more.
The second of the tutorial flights takes you from Franz-Josef-Strauss Airport, Munich (EDDM) to Bologna's Borgo Panigale Airport (LIPE) and takes under 1 1/2 hours to complete. This second tutorial is a bit more abbreviated than the first, so it is highly recommended that you read first, then fly the first tutorial, then proceed on to the second.
These tutorial flights can be found in your select a flight section of MSFS. You'll need to set up times and such, and weather is optioned in for you for this tutorial (some rain). These tutorials will take you all the way through start up to parking and leaving the aircraft. The information was extensive in the manuals, but I personally would have liked more pics of the panels in the tutorials, and the ones that are there could have used some more labeling, but this is just a small, picky thing, not meant to detract from the wealth of information that can be found in the manual on the operations of the ATR.
About the package, Jean-Pierre Cousserans of ATR, had the following to say, "The flight simulation world is so big today that it became evident for ATR that we needed to be present - as in the real life with more than 650 ATRs flying worldwide - with a high quality representation of our aircraft. We selected Flight One Software for their demonstrated ability to produce outstanding aircraft, highly realistic and with extensive features. We are very proud of this partnership and are confident that the ATR developed by Flight One Software will set new standards in the Microsoft Flight Simulator world."
This "partnership" with ATR enabled the folks at Flight One to provide you with one h---of a great package! This cooperation between the makers of the ATR and Flight One ensured that the final product that was put out there for the sim world to enjoy would be one that would set some standards for others to meet!
This is a great product! Standards are definitely set with this one. To sum it all up, experienced simmers will be impressed with the visuals and the dynamics of this product, and may offer a bit of a challenge for them as well. Learning new and larger aircraft, but don't want to jump right into the huge "heavies" right off the bat? This product is also for you. Be prepared for some reading and study though. What fun is a hobby if you don't learn more about it? For you folks that are just starting out in the flightsim world, you may want to get a few hours of flying time under your belt before you purchase this package. As soon as you have worked your way through the MSFS tutorials, I would definitely recommend this aircraft as your next challenge for the medium sized commercial aircraft. You'll have the benefit of learning right from the start, state of the art avionics and flight navigation techniques using these fantastic tools. The price of this product is $34.95 USD, and is worth every penny!
System Requirements:
This product is only compatible with FS2004, so of course, FS2004 is required. For your computer, they recommend you have a 1.6 GHz machine, with a 128 Mb memory video card. System memory should be a minimum of 512. Low-end on-board sound chips are NOT recommended. A plug-in sound card, such as a SoundBlaster Audigy, is recommended. In some cases, sounds will not work correctly unless you have an adequate sound card.
Windows XP is the official operating system that is supported for use with the ATR. It may work with other Microsoft operating systems; however this is not supported by Flight One.
Purchasing the Product:
A disc version of this product is available, as well as the boxed version from Farmboyzim's "General Store". The E-Commerce enabled download executable is about 149 MB in size. The purchase screen will appear when you run the executable. The servers do support Resume, however they do not recommend certain download managers because they can sometimes corrupt large downloads. Flight1 does offer a free download manager for the ATR.
Once you have the product installed, do yourself a favor and read the manual first, or you might just have problems. For example, an important bit of information on loading the aircraft up for a flight is mentioned. What you need to do is start MSFS with a default aircraft, and once in position, hit the"alt" key and go to the "aircraft select" up in the menu, select the ATR, hit OK, and she'll load up with some very cool sounds! The folks at Flight 1 informed me that this is just to ensure that everything gets loaded properly. Not really a serious issue I thought.
There are a lot of things going on in this product, and I tried to cover some of the highlights of this fine add on. I'm sure that I may have left out some great details of this product. You can find out more by visiting the links below. Between the two of us, I think everything may just be covered!
For more information on this fantastic aircraft add on visit: www.flight1.com
Visit their dedicated ATR site at: http://atr.flight1.net


Click Picture For Larger View
Thanks For The Visit !
Farmboyzim's Flight Sim's
Flight 1 Software's ATR 72-500
By Farmboyzim
Click Pictures for Larger Views